
Pick a grind a notch coarser if the shot drags past 25 seconds, and keep the same size for every dose. Use a WDT or distributor to break clumps and flatten the puck, then level the basket with a spirit level before tamping. Apply 10‑15 kg of even pressure, leaving about 0.3 cm headroom. Pre‑infuse at 2‑4 bar for 15‑40 seconds and lower brew pressure to 6‑8 bar to stabilize the bed. Clean the grinder regularly and purge between doses to avoid stale particles. If you keep this routine, you’ll discover even more tricks to perfect your espresso.
Choose the Right Grind Size to Stop Espresso Channeling
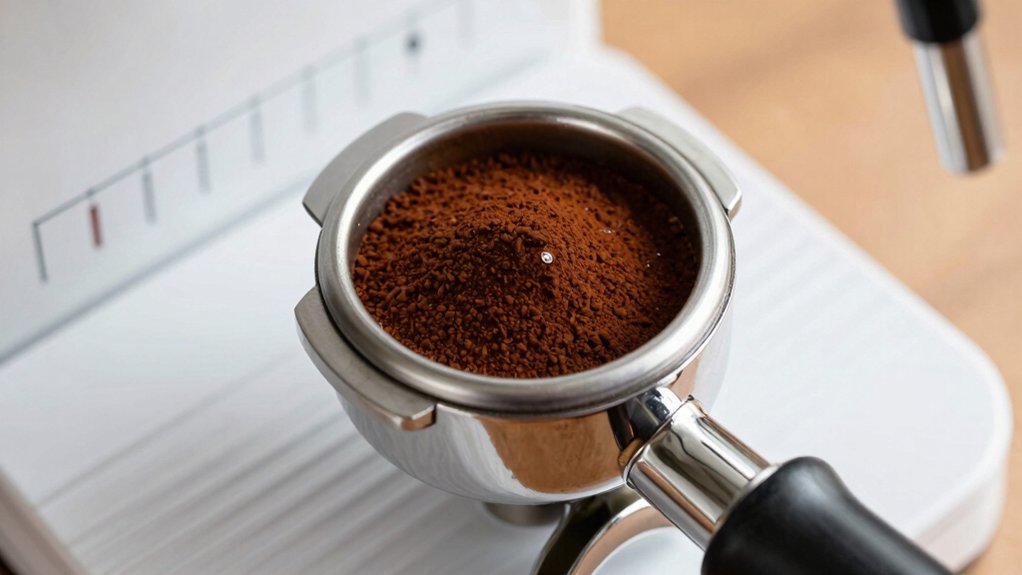
Why does your espresso sometimes pour like a thin stream instead of a rich, even crema? You’re probably battling grind size issues that cause channeling and uneven extraction. Start by dialing the grind a notch coarser if the shot drags past 25 seconds; less resistance lowers the chance of edge channels forming. Consistency matters—use the same grind size across the entire dose to keep the puck resistance uniform. When you switch to a bottomless portafilter, fine grinds reveal channeling instantly, so adjust until the first drops fall evenly and the flow steadies. Purge the grinder between doses to prevent drift, and tweak stepwise until the shot pulls smoothly, delivering a balanced, crema‑rich espresso. Grind setting versatility
Distribute Grounds Evenly With a WDT or Distributor
Ever notice how a single clump can ruin an entire shot? You can stop that by using a WDT or a dedicated distributor before tamping. Insert the thin needles of a WDT into the grounds, give them a few quick twists, and you’ll break up clumps while pushing coffee to the full depth of the puck. If you prefer a tool, place an OCD/NCD distributor on top, spin it a couple of times, and you’ll create a flatter, more even bed. Both methods improve distribution, flatten density variations, and keep water from finding easy paths that cause channeling. Use a dosing funnel to keep grounds contained and avoid mess, ensuring a consistent, uniform puck every time. Properly rotating or tapping the basket after distribution can further settle the grounds before tamping, reducing air pockets and promoting even extraction distribution accuracy.
Level the Puck on a Flat, Stable Surface Before Tamping
Ever notice how a slightly tilted portafilter can ruin a shot before you even tamp? You need to level the puck on a flat, stable surface first. Place the portafilter on a level countertop, check that the basket sits evenly, and use a spirit level or calibrated tamper base to verify zero tilt. A level bed stops thin edges from forming fast channels, which keeps water from carving gaps during extraction. If the puck looks uneven after distribution, tap lightly around the edges, re‑check levelness, then proceed to tamp. Consistent leveling gives a reproducible foundation for even extraction and reliable results. leveling principle supports precise tamping alignment and helps maintain uniform contact across the puck.
| Step | Action |
|---|---|
| 1 | Set portafilter on flat surface |
| 2 | Verify basket level with spirit level |
| 3 | Tap edges, re‑check, then tamp |
Apply Uniform, Moderate Pressure When Tamping
Applying uniform, moderate pressure when tamping is key to preventing channeling. You should aim for about 10–15 kg of force, enough to compress the grounds into a flat, cohesive puck without cracking it.
Start by checking that the portafilter sits evenly in the group head; a level tamp eliminates wobble and keeps the puck even. Hold the tamper steady, avoid edge‑contact, and don’t tilt it—this maintains consistent tamping pressure across the surface.
If you notice any surface irregularities, give the puck a light diagonal polish after the initial press. That final pass seals the top, ensuring the water flows uniformly and the espresso extracts cleanly. Borosilicate glass offers lightweight durability and excellent thermal shock resistance, which can help keep your cups stable during crema-rich pulls.
Leave a Small Headroom in the Portafilter to Avoid Over‑filling
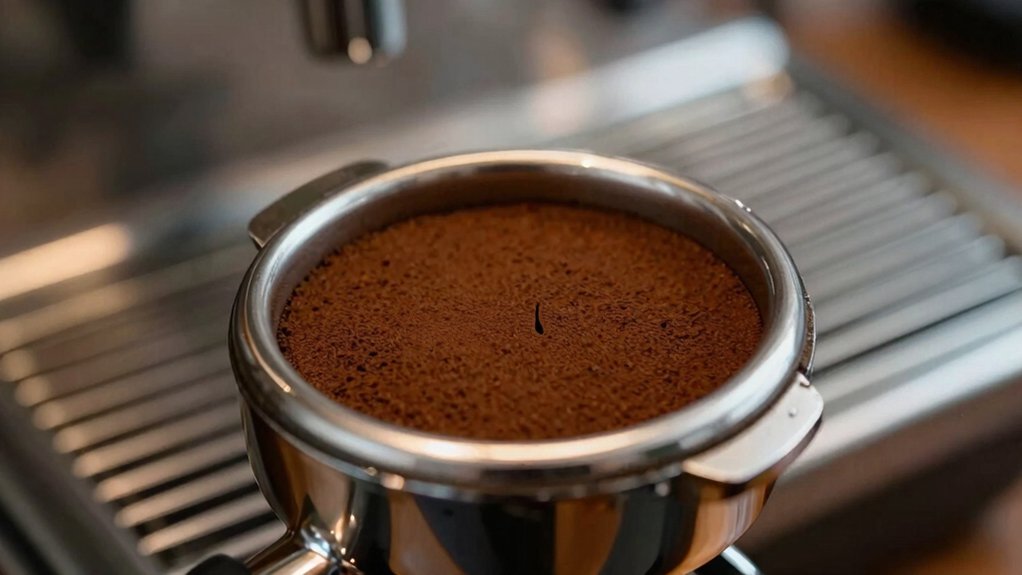
Even with a perfect tamp, an over‑filled basket will still force water through a cramped puck, creating uneven channels. To keep the extraction smooth, you need a tiny gap between the coffee surface and the rim of the portafilter. Aim for about 0.3 cm of headroom so the bed stays even and the water can flow uniformly. After dosing, gently level the coffee and check the flat top; if you see a slow shot, verify that the headroom isn’t compromised before tweaking grind or tamp pressure. Measure the dose, then pull the portafilter out and eyeball the gap. Use a dosing funnel to pour just enough coffee, leaving visible headroom. Lightly tap the side to settle the puck without compressing it. Confirm the top is flat; adjust if the coffee touches the basket edge. Headroom for Even Extraction
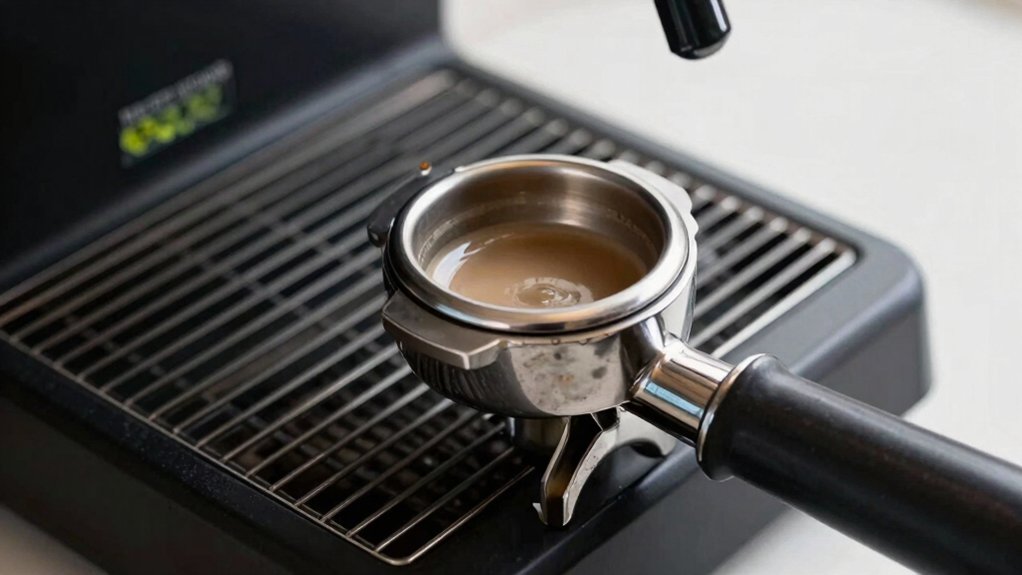
Spot Channeling Early With a Bottomless Portafilter
How can you tell if your shot is channeling before it ruins the taste? You’ll see uneven drops, a thin or broken crema, and jets shooting from one side of the puck when you pull a shot with a bottomless portafilter. Those visual cues point straight to channeling, letting you catch the problem early. Watch the flow: if water streams from a single spot or multiple small jets, the bed’s distribution is off. After extraction, inspect the puck for holes or other irregularities—signs that tamping wasn’t even. Using a bottomless portafilter forces you to perfect distribution and tamping, because any puck irregularities become instantly visible, letting you adjust before taste suffers. This quick visual feedback saves time and preserves flavor. Regularly checking for channeling during practice helps you dial in grind size, dose, and tamp pressure for consistent shots channeling awareness.
Adjust Brew Pressure or Pre‑infusion to Stabilize the Bed
You can keep the puck from forming channels by lowering the brew pressure and extending the pre‑infusion.
Start with a gentle 2–4 bar pre‑infusion for 4–8 seconds, then ramp up to the normal 9–10 bar. If the flow feels uneven, lengthen the pre‑infusion a bit or tweak the grind until the bed saturates uniformly. Consistent temperature control during extraction can help maintain even flow and extraction quality, leveraging stable pressure and pre‑infusion timing temperature stability.
Lower Brew Pressure
Ever notice how a stubborn, uneven flow can ruin a shot? Lower brew pressure is your secret weapon for channeling prevention. By dropping from the usual 9 bar to 6–8 bar, you let water glide through the puck, reducing deformation and keeping the bed stable.
Pair this with a gentle pre‑infusion at 2–4 bar for 5–15 seconds, and you’ll achieve even extraction without harsh pressure spikes.
A gradual pressure ramp mid‑shot further smooths the flow, letting the grounds settle uniformly.
- Start with a low‑pressure pre‑infusion (2 bar) to saturate the bed.
- Increase to a modest brew pressure (6 bar) for extraction.
- Mid‑shot, ease pressure gently rather than holding 9 bar.
- Adjust grind size if channels still appear, keeping pressure consistent.
Extended Pre‑Infusion Time
Lowering brew pressure already smooths the flow, but extending the pre‑infusion period takes stability a step further. You let the puck saturate gently, letting air pockets dissolve and preventing channeling. A low‑pressure burst (2–4 bar) for 15–40 seconds creates uniform extraction before you ramp to full pressure, giving flow stabilization and consistent shot times.
| Pressure (bar) | Time (seconds) | Effect |
|---|---|---|
| 2–4 | 15–40 | Gradual puck saturation |
| 5–6 | 8–25 | Faster wetting, still uniform |
| 7–9 | 5–10 | Risk of uneven flow, possible channeling |
Apply this pre‑infusion technique, watch the flow curve, and you’ll see smoother ramp‑up, even puck saturation, and a cleaner espresso without channeling.
Keep Your Grinder Clean for Consistent Particle Size
You should clean the burrs regularly to stop oil and fines from building up and causing clumps. By wiping out old grounds and running a quick purge between doses, you keep the particle size uniform. Tracking each dose with a scale lets you verify that the grind stays consistent after every cleaning.
Regular Burr Cleaning
A clean set of burrs is essential for keeping your grind size consistent and preventing espresso channeling. Regular burr cleaning removes old oils and dust that cause clumps, ensuring grind consistency and smooth puck resistance. By brushing the burrs after each use and performing a deep quarterly disassembly, you stabilize particle distribution and boost channeling prevention. Use a grinder‑friendly tablet cycle or a handful of rice to dissolve residual oils, then re‑calibrate and test a shot for even flow.
- Brush burrs with a soft brush after every pull.
- Run a cleaning tablet or rice cycle weekly.
- Disassemble and deep‑clean quarterly.
- Re‑calibrate and verify with a test shot.
Avoid Stale Grounds
Keeping your grinder clean is just as important as brushing the burrs after each shot, because stale grounds and oil buildup quickly create uneven particle sizes that invite channeling. When you let stale grounds sit, the oil thickens and clumps form, making the grind inconsistent and the puck porous. Regular grinder cleaning restores grind freshness, so each dose extracts evenly. After each dose, purge between doses to flush out mixed particles and prevent fines from migrating into the next shot.
Pair this routine with bean roast freshness—use beans within two to three weeks of roast to keep the oil content low and the particle distribution tight. By treating your grinder like a precision tool, you eliminate the hidden variables that cause channeling and enjoy reliable espresso every time.
Select a Roast Profile That Matches Your Espresso Dose
Which roast profile will best complement your espresso dose? You need a roast that syncs with your dose, keeps bed resistance steady, and curbs channeling during espresso extraction. A medium‑dark bean often hits the sweet spot for a 25‑30 second pull, while a darker roast can handle a finer grind if you’re edging toward an overdosed puck. Light roasts may amplify sourness when channeling slips in, so balance sweetness and body to stay within the target window.
- Choose a medium‑dark roast for a balanced dose‑to‑grind ratio.
- Opt for a darker roast if you prefer a finer grind and faster extraction.
- Avoid very light roasts when channeling risk is high.
- Adjust grind size to match the roast’s resistance and maintain consistent espresso extraction.
Follow a Consistent Workflow From Dose to Extraction Timing
You’ll start by weighing each dose to the gram and grinding to the exact setting you’ve calibrated, then pull a shot that hits your target 25‑30‑second window.
Keep the flow steady and watch the crema; if it drips unevenly, tweak the grind only after confirming the dose and timing are spot‑on.
Measure Dose Consistency
How can you keep espresso from channeling? You need strict dose consistency, because an uneven dose creates density gaps that invite channeling. Weigh each dose on a scale, staying within ±0.2 g, and lock in a fixed amount—18 g for a single, 18–20 g for a double. Keep your grind size steady, purge the grinder between doses, and follow the same pre‑ and post‑dose workflow: grind, distribution, tamp, pre‑infuse. Track extraction timing (25–30 s) and only tweak dose or grind after you see a timing drift.
- Weigh the coffee precisely.
- Purge the grinder to lock the grind size.
- Distribute evenly before tamping.
- Record extraction time and adjust later.
Grind Size Precision
Ever wondered why a single shot sometimes gushes out in a rush while the next dribbles slowly? You can tame that chaos by mastering grind size precision. Keep the burrs on a steady setting for each dose, so particle distribution stays stable and puck uniformity improves. Purge the grinder between doses to avoid fine‑mines that create hidden channels. Align dose weight with basket headroom; an overfilled puck squeezes flow and sparks edge‑channeling. Track extraction timing visually and by taste, confirming that your grind tweaks yield a smooth, 20‑30 second pull for an 18‑20 g dose. This disciplined workflow locks in dose consistency and slashes channeling risk.
| Step | Action | Goal |
|---|---|---|
| 1 | Set burrs consistently | Uniform grind size |
| 2 | Purge between doses | Prevent fine‑mines |
| 3 | Align dose & headroom | Preserve puck uniformity |
Extraction Timing Control
Why does a shot sometimes finish in ten seconds while the next drags past forty? You can tame that mystery by locking down every step from dose to extraction timing. First, weigh a consistent dose and grind to the same range each time. Next, practice distribution and tamping on a level surface to set a uniform bed. Then, trigger a brief pre‑infusion to smooth the initial flow. Finally, watch the flow timing with a stopwatch, aiming for a steady 25‑30‑second pull. Adjust grind or dose only when the timing drifts outside that window.
- Weighing a consistent dose – guarantees the same amount of coffee each shot.
- Distribution – spreads particles evenly, preventing early channel formation.
- Tamping – creates a level, compacted puck for uniform pressure.
- Pre‑infusion – softens the bed, stabilizing flow timing before full pressure.
Frequently Asked Questions
How to Stop Espresso Channelling?
Use a consistent grind, distribute evenly with WDT, tamp level with steady pressure, leave proper headroom, and purge the grinder between doses. These steps flatten the puck and stop channeling.
What Is the 30 Second Rule for Espresso?
You aim for a 25‑30‑second pull from the moment the stream starts until it stops. If it’s faster, grind finer; if slower, grind coarser, adjusting dose and tamp until the shot lands inside that window.
Is Espresso Bad for LDL Cholesterol?
You won’t raise LDL dramatically with plain espresso; it’s low in diterpenes. But adding cream, whole milk, or sugary syrups can increase LDL, so keep add‑ins minimal for heart‑healthy sipping.
How to Get Rid of Channeling?
You’ll eliminate channeling by using a distribution tool, tamping evenly, adjusting grind size and dose, purging the grinder, and checking a bottomless portafilter for uneven flow.
In Summary
By mastering grind size, evenly distributing grounds, and tamping with consistent pressure, you’ll eliminate channeling and pull balanced shots. Keep the portafilter level, leave a tiny headroom, and fine‑tune pressure or pre‑infusion to stabilize the bed. A clean grinder and a roast that matches your dose round out the process. Stick to a repeatable workflow from dose to extraction timing, and every espresso will taste smooth, rich, and free of channeling.

Leave a Reply