

You’ll get perfect steamed milk by creating a dense, silky micro‑foam that holds shape and pours smoothly. Start with the wand just below the surface, tilt the jug to form a smooth vortex, and add tiny air bursts while the milk stays at 140‑150°F (60‑65°C). The protein film traps air, while a thin fat coating smooths bubble edges and prevents coalescence. Over‑heating past 150°F denatures proteins and collapses the foam, so stop at the sweet spot. Keep your wand clean and you’ll master latte‑art consistency, and the next steps will reveal deeper techniques.
Why Perfect Micro‑Foam Matters for Latte Art
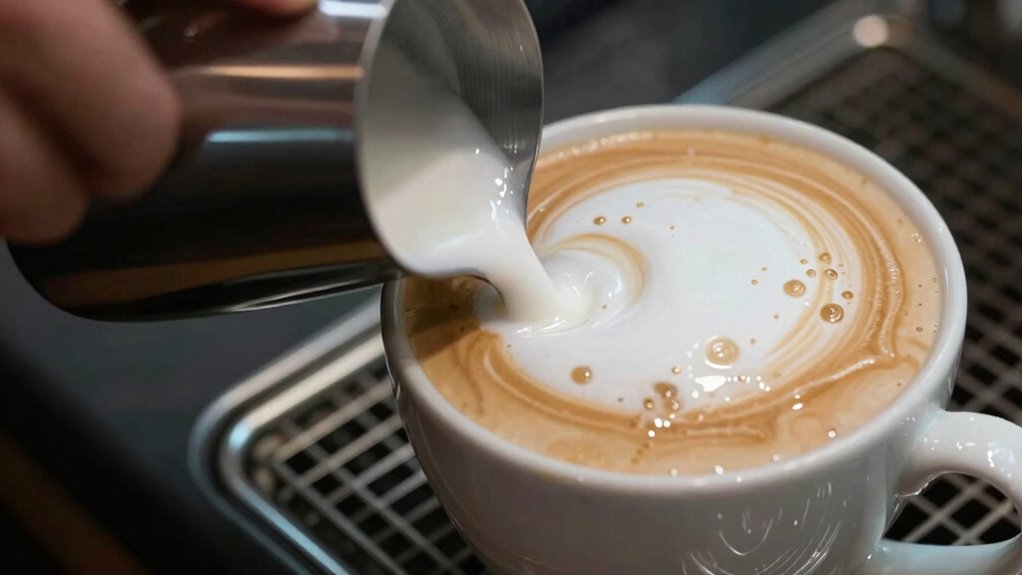
Why does perfect micro‑foam matter for latte art? You need a stable, silky texture so the milk flows smoothly and holds shape. When you steam whole milk, proteins wrap around air bubbles, creating a dense network that supports fine lines and swirls.
Skim milk’s lower fat gives thinner foam with larger bubbles, making designs wobble or bleed. If you overheat past 150–160°F, proteins denature, the foam thins, and your artwork collapses.
Fat adds flavor but can destabilize the foam if it’s too high, while plant milks demand careful temperature (130–160°F) and whisking adjustments to mimic dairy micro‑foam.
Mastering these variables lets you pour crisp hearts, rosettes, and intricate patterns without unwanted bubbles Milk Frother Clip.
Master the Vortex for Latte‑Art Milk
You’ll start by positioning the wand just below the surface and tilting the jug to launch a smooth, even vortex.
While the milk spins, you’ll add tiny bursts of air and then submerge the wand to lock in a glossy microfoam, adjusting the angle for your machine’s design.
If the swirl stalls, make a slight reposition and give it a second to settle before you finish.
In practice, a high-wattage frother (600W–800W) with precise temperature control helps maintain stable foam and prevents scorching. temperature control and the right milk composition (higher protein and fat content) contribute to more consistent microfoam across different drinks.
Positioning the Wand
Where should you place the wand tip to coax a perfect vortex? You start with the steam wand tip just below the milk surface, keeping the jug level before you tilt. Lightly rest the jug against the wand’s spout so the angle is gentle and the vortex points toward the machine, not your hand. Begin level, then tilt slightly to create a controlled spin that pulls milk into a smooth vortex. Use “kissed injections” by briefly adding tiny air bursts while maintaining the steady spin, avoiding large bubbles. Keep the wand oriented toward the machine to prevent splashing and to ensure consistent circulation and texture development. Mastering steam wand positioning gives you the foundation for silky, glossy milk ready for latte art. Over-Ice Temperature Adjustment
Creating a Stable Vortex
A steady vortex is the engine behind silky, glossy milk, and you can coax it into life by starting with the wand tip just below the milk surface, then gently tilting the jug to set the liquid spinning.
Keep the jug’s spout edge lightly against the wand, aim the wand toward the machine, and let the vortex motion develop. If the swirl stalls, make tiny positional tweaks and wait one to two seconds for the flow to settle.
Introduce small “kissed” air bursts while the vortex stays intact, creating fine bubbles without breaking the spin. Practice with water or detergent first to master the motion, then apply the same technique to milk for consistent, velvety texture. This approach aligns with best practices for maintaining clean equipment, including using high-quality barista towels to keep surfaces spotless during steaming. vortex control
Adjusting for Machine Type
Ever notice how a home espresso machine feels sluggish compared to a commercial one? You’ll feel that difference in steam pressure. On a low‑pressure home unit, keep the jug small—no more than 200 ml—and tilt the wand slightly toward the machine. Submerge the tip just below the surface, then let a gentle vortex form. If the spin falters, make tiny positional tweaks or add brief, controlled “kissed” air bursts while preserving the motion. Commercial machines pump higher steam pressure, so you can work with larger volumes and generate a robust vortex quickly, but watch the temperature to avoid overheating the foam. For either setup, practice with water and detergent first to lock in a smooth, consistent spin before adding milk. The idea of maintaining consistent temperature and flow aligns with how precise measurements (like TDS or Brix readings) require stable conditions to be reliable sensors and reproducible.
Hit the Sweet Spot: Heat Milk to the Ideal Temperature
Wondering why your latte art sometimes falls flat? You’re probably missing the sweet spot when steaming milk. Aim for 140–150°F with dairy; go higher and you’ll burn the sugars, curdle proteins, and watch the foam collapse.
Plant‑based milks sit a bit lower, roughly 130–160°F, but each brand may shift that window, so test the recommendations from your favorite café.
When the temperature climbs past 150°F, the foam stiffens, becoming less pourable and harder to shape. Overheating denatures the proteins that hold the micro‑bubbles together, ruining stability.
Keep a thermometer handy, watch the thermometer, and stop the steam as soon as you hit the target. That precise heat gives you silky, glossy foam ready for flawless latte art.
Temperature range awareness helps you dial in the exact heat window for different milks and brands, ensuring you consistently hit that perfect microfoam texture.
Introduce Micro‑Air Bubbles for Silky Latte‑Art Foam

How do you coax those silk‑smooth, paint‑like bubbles that make latte art pop? Begin by plunging the steam wand just below the milk surface, then tilt the pitcher to keep the tip submerged as you spin the milk. This creates micro-air bubbles—tiny (<50 µm) pockets that form a velvety foam. Keep the wand steady, angled about 45°, and watch the temperature stay around 140–150 °F. Whole milk’s fat and protein matrix stabilizes those delicate bubbles, while skim milk tends to produce larger, uneven foam. After the initial aeration, continue swirling for a few seconds so proteins fully envelop each bubble. The result is a glossy, paint‑like micro‑foam that holds intricate latte‑art designs without collapsing. Micro‑air bubbles contribute to the foam’s stability and texture, making precise latte art more achievable as you fine‑tune the steam technique.
How Protein, Fat, and Heat Keep Your Latte‑Art Foam Stable
You’ll notice that the protein film wraps each bubble, keeping the foam intact while the fat adds a silky, creamy body that prevents the bubbles from popping too quickly.
If the temperature climbs past the sweet spot, the proteins denature and the foam collapses, so you must stay around 140‑150 °F.
Balancing protein‑bubble interaction, modest fat, and precise heat gives you the stable canvas needed for crisp latte‑art designs.
Protein‑Bubble Interaction
Ever wondered why a well‑steamed latte holds its art so cleanly? Milk proteins form a viscoelastic skin around each air bubble, adsorbing onto the surface and stopping coalescence. As you steam, the proteins unfold just enough to create a stretchy network that holds bubble walls together while still allowing micro‑foam to flow. Keep the temperature between 140–150 °F; beyond that, denaturation weakens the skin, letting bubbles pop and the foam lose its glossy sheen. The tighter the protein network, the smaller and more uniform the bubbles become, giving you a stable canvas for rosettes and hearts. Adjust your steam wand angle and pressure to inject tiny bubbles, and let the protein film do the rest.
Fat‑Stabilized Creaminess
A balanced mix of protein, fat, and heat creates the creamy, stable foam that keeps latte art intact. When you steam, the fat coats each bubble, smoothing edges and preventing coalescence. Whole milk’s richer fat yields den, tighter bubbles that hold designs longer than skim milk. Plant milks like oat also work because their fat‑protein balance mimics dairy, giving a silky microfoam if you stay within the 140‑150 °F window. Avoid overheating—excess heat breaks down fat emulsions and collapses the foam, ruining your art.
- Choose milk with higher fat (whole or oat) for thicker foam.
- Steam to 140‑150 °F to preserve fat coating.
- Keep air incorporation steady; too little leaves weak foam.
- Stop before proteins denature; the fat layer then holds the shape.
Temperature‑Controlled Denaturation
How does heat shape the foam that carries your latte art? When you steam milk, you’re actually denaturing proteins at a specific temperature range. Around 60–65 °C (140–149 °F), casein and whey unfold, forming a fine network that traps air and creates a glossy, stable microfoam. If you push the temperature past 70–75 °C (158–167 °F), the proteins over‑coagulate, the film thins, and the bubbles collapse, ruining your design.
Whole milk’s fat coats those bubbles, giving them a creamier, more resilient texture, while skim milk relies solely on the protein film, making it more vulnerable to heat. By monitoring temperature and stopping at the sweet spot, you preserve the protective film, keep surface tension balanced, and ensure your latte‑art foam stays pourable and crisp.
Fix Common Milk‑Steaming Problems and Keep Your Wand Clean
Why does your milk sometimes turn lumpy or lose its silky sheen? You’re likely dealing with a dirty steam wand or an uneven steaming technique. A blocked tip, stale milk residues, or seasonal protein shifts can all wreck microfoam. Follow these steps to rescue texture and keep your wand pristine:
- Purge after each use – run steam for a few seconds to clear pressure loss and prevent buildup.
- Inspect and clean the tip – remove milk blockages; a clean tip restores smooth foam.
- Choose the right milk – whole milk gives silkier foam; oat milk needs stricter cleaning and shorter cycles.
- Test with water first – reassemble, steam water, then return to milk to isolate tip‑related issues.
Adjust frequency when protein levels change, and you’ll maintain consistent, velvety milk for latte art.
Frequently Asked Questions
How to Get Perfect Steamed Milk for Latte Art?
You’ll get perfect steamed milk by using whole dairy or oat milk, aerating briefly, then submerging the wand just below the surface, keeping the jug tilted, steaming to 140‑150°F, and purging the wand afterward.
Why Does My Steamed Milk Not Make Latte Art?
You’re over‑ or under‑aerating the milk, using the wrong temperature, or picking a low‑protein milk; these create large bubbles or brittle foam, preventing the smooth microfoam needed for latte art.
Which Milk Is Best to Steam for a Latte?
You’ll get the best latte art with whole milk, preferably a barista‑grade brand; it creates rich, stable foam at 140‑150°F. If you need a dairy‑free option, oat milk works most consistently.
What Are Some Common Steamed Milk Mistakes?
You’ll overheat milk, submerge the wand too deep, neglect cleaning the tip, use skim milk, or pour before the foam reaches a silky, paint‑like texture, causing stringy, unstable latte art.
In Summary
Mastering perfect steamed milk boils down to a few key steps: keep the milk at 140‑150 °F, create a smooth vortex, and introduce tiny air bubbles for that glossy micro‑foam. Balance protein and fat to lock the foam in place, and stay on top of common issues—over‑heating, large bubbles, or a dirty wand. Nail these basics, and your latte art will be consistently silky, stable, and picture‑perfect.


